Appointment Details


|
|
|
|
Because life is more than just Auditions, Callbacks and Bookings...
Sometimes it's Dental Visits, Jury Duty and Workouts.
Whatever Appointments life throws at you PerformerTrack's Add Appointment screen will be at the ready!
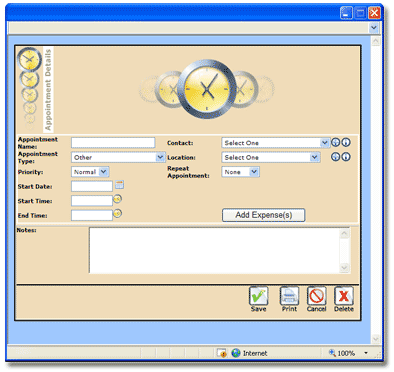
When you click the Add Appointment Button, this will launch the Appointment Details pop-up window.
Here is where you will put all of the pertinent information regarding your intended appointment.
Let's have a look at how Appointment Details works:
_______________________________________________________________________
You have the ability to name your Appointment in order to make it more descriptive than the Appointment Type.
Here are some examples:
Appointment Name = Stafford's Commercial Class Appointment Type = Class
Appointment Name = E3 Appointment Type = Convention
Appointment Name = The Chicago SketchFest Appointment Type = Festival (Comedy)
_______________________________________________________________________
From Air Date to Writing Session The Appointment Type drop down menu has hundreds of pre-defined choices for you to select from!
_______________________________________________________________________
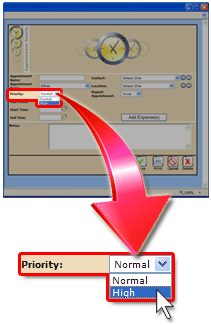
PerformerTrack allows you to set a Priority Level for the Appointment.
By default, all Appointments have their Priority Level set to Normal.
However, you can set the Priority Level to High.
_______________________________________________________________________
CALENDAR BUTTON
CLOCK BUTTON
_______________________________________________________________________
Select the Appointment Contact from the drop down menu. The Contact drop down menu displays all of the Contacts in your Contacts Section allowing you to quickly select their name from the drop down menu!
ADD BUTTON
INFO BUTTON
_______________________________________________________________________
This way if you find yourself going to the same Location for multiple appointments then all you will need to do is enter the Location once into PerformerTrack and it will always be there - ready for you to select from the Location drop down menu!
ADD BUTTON
INFO BUTTON
_______________________________________________________________________
Do you have recurring Monthly Appointments like Resume Updating, Union Meetings, Agency Check-Ins?
If you do then scheduling them within PerformerTrack is a snap!
Simply select Daily or Weekly from the Repeat Appointment drop down menu. Doing so will trigger the End Date field box to appear!
CALENDAR BUTTON
Is there a business-related Expense associated with this Appointment (i.e. - Business Meal, Fare, Mileage, etc.). Depending on the tax laws in your location these may be legitimate tax-deductible expenses.
To add Appointment-related Expenses simply click on the ‘Add Expense(s)’ button.
_______________________________________________________________________
Were you told to bring anything to the Appointment? Is there anything you wish to comment on regarding this Appointment?
If so make sure to enter this of information in the 'Notes' area for future reference!
_______________________________________________________________________
In order to save the Appointment you must click the Save Button (obvious, huh?).
_______________________________________________________________________
When you want to print the Appointment Details simply click the Print Button. Doing so will automatically Save any changes and will launch the Print Preview Screen.
_______________________________________________________________________
If you wish not to save any changes to the Appointment Details or want to exit the Appointment Details screen just click the Cancel Button.
_______________________________________________________________________
If you wish permanently remove the Appointment from your Calendar click the Delete Button.
|